PW200M and a 7800GT
 I was quite curious whether the PW200M could handle a high end graphics card like the Nvidia 7800GT. Although the 7800GT is not a top of the line model, it is a very decent performer (paired with the Opteron 144 = 21,500 3DMark2001: 13,900 3DMark2003 : 6,700 3DMark2005) and at the same time relatively energy efficient compared with similar performing cards. The PW200M is rated at 200W which should be more than sufficient to run my system with the 7800GT. But my AC/DC adaptor was only rated at 150W (I did not purchased the 220W adaptor used in the Shuttle SD11G5 barebone as it's too expensive). From my calculations though, 150W should still be enough. Using the Asus A8NVM-CSM's onboard graphics, maximum system AC draw with the PW200M was under 85W. Based on previous readings taken with the 7800GT using the less efficient Aria PSU, the graphics card needed an additional 80W under load. Total 165W AC draw at an assumed efficiency of 85% would give 140W DC. This is just under the AC/DC adaptor's rating and seems a little too tight for comfort, so just to be on the safe side, I used CrystalCPUID to undervolt the CPU down to 1.0v (which ran Prime95 stable for more than 48 hours). This should save around 15W, keeping in mind this undervolt will only come into effect after Windows boots up.
 The 7800GT requires a PCI-E power connector and comes with an adaptor that requires two molex plugs. As the PW200M only comes with 2 molex plugs and both are being used (HDD/CD), this 1-to-3 molex splitter was needed.
I am happy to report that the system booted up with no problems. The maximum AC draw came in at just under 150W, factoring in 85% efficiency we are looking at around 130W DC, very close to our original estimate. Certainly this disproves all the marketing hype and general push for higher wattage PSUs(bigger is better), although there are some systems that can get very power hungry.
QUIET PLEASE
So the PW200M and the AC/DC brick did their job of running the system, but unfortunately with the stock AMD heatsink fan, the reference 7800GT cooler fan, and the 120mm exhaust fan, the system was nowhere near quiet. Unlike the quiet starting point and easy modding of the Pundit, this higher powered system posed more of a challenge.
 First thing was the 120mm fan. Actually much of the noise was caused by vibrations as the rear panel by itself is now very thin and flimsy once the original PSU was removed. Soft rubber fan grommets (seen in blue) was an easy mod and significantly quieted down the vibrations, leaving only the whooshing noise of the fan.
 For the 7800GT, despite consuming relatively low power and having fan speed control, was still too loud for a quiet system. There are quite a few quiet VGA cooler replacement options, most of which are "two-slot" solutions (meaning the heatsink will also take up the adjacent PCI slot).
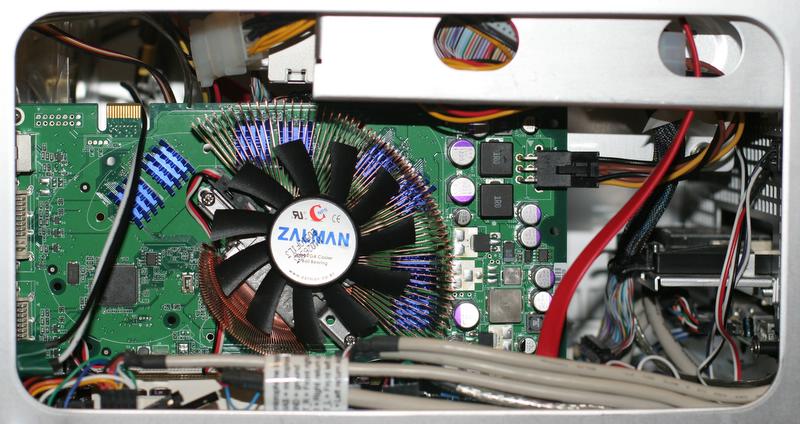
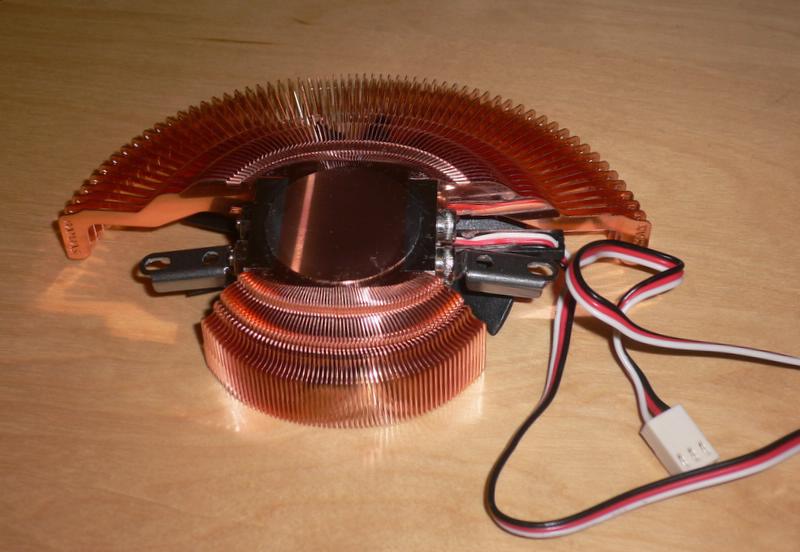 The Arctic Cooling NV Silencer 5 is a nice option which has the added advantage of exhausting hot air out of the system through the PCI slot. However I happened to have a Zalman VF700Cu cooler on hand, which from various reviews seems to cool only slightly less effectively than the AC, but has a quieter fan.
 The Zalman comes with nice blue RAM heatsinks that are stuck on with adhesive thermal tape. The VGA heatsink replacement was also relatively easy, involving removing/fixing a few screws and cleaning/applying some thermal paste.
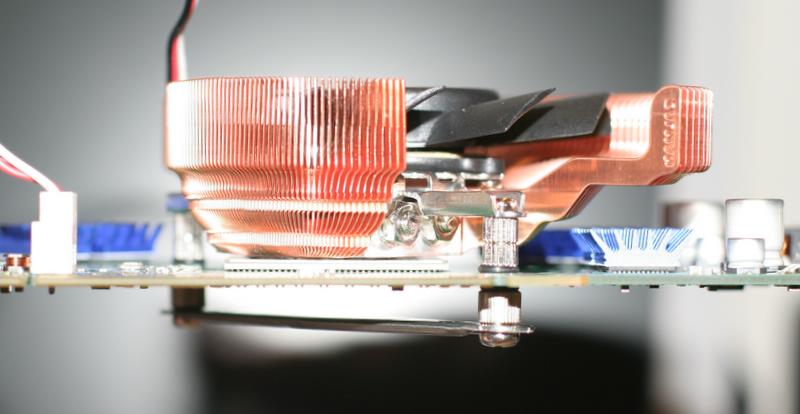 Zalman provides a molex adaptor that allows you to set the fan at 5 or 12v, however I preferred to keep to the cards own dynamic fan speed control. It has a low speed setting for 2D use, and a high speed setting for 3D mode. The fan header on the card is a 2 pronged, whereas the Zalman fan is a regular 3 pronged. The plastic frame of the card's plug however is easily removed with some prying, leaving two exposed pins where the 3 pronged fan header can be plugged in (red matched to red, black to black, third wire only for rpm monitoring is not supported/needed by the 7800GT).
Here is a before and after look.
 Next up, the CPU cooler. Although the stock AMD fan is relatively smooth, it can get quite loud. The low profile of the Aria case does not leave a lot of space between the CPU and HDD cage, so choice of a replacement quiet CPU cooler is limited. I had a Thermaltake Pipe101 heatsink lying around that I bought for an AMD Socket A system I never got around to installing. It's a copy of the once popular Socket A cooling champ, Thermalright's SLK900A/SP97; it's 500g of copper with 4 heatpipes, comes with K8 mounts, takes 80 or 90mm fan, and is now sold for under $20.
 The only 92mm fan I had was a Silverstone FN82, which is a little peculiar as despite it's 92mm blades, comes with a frame with 80mm mounting holes. It is rated at 26dBA, 37CFM, 2100rpm, 0.22A Max, and fitted with Maglev bearing.
 The Pipe101 comes with an aluminum frame which wraps around the heat sink for mounting the fan. But despite it being designed with 92mm mounting, the edge of the frame actually blocks part of the fan; around 1cm on each side (left and right). Worried this may block airflow or even cause backflow, I decided not to use this frame. Instead I tied down the fan using (you guessed it) some recycled cable-ties.
 Considering how hot the CPU heatsink can get, this probably was not the best choice, but I can replace it after my initial testing. Between the fan and the heatsink, I sandwiched a small foam disk to insulate the vibrations (this was recycled from the packing of some blank CDRs). No vibration or chatter could be heard, and again only the whooshing of the fan. The height of the HSF is just right, leaving enough clearance to the bottom of the HDD. Testing th
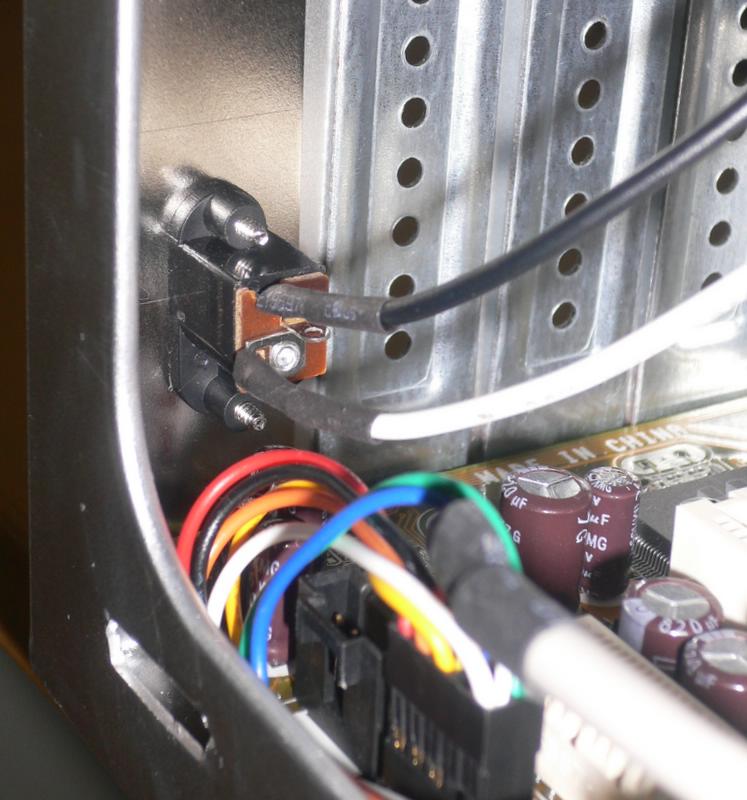 The last step was not noise related, but related to the PW200M. The 12V DC input jack was attached to a PCI bracket that was included with the PSU. Here is a view from the inside. I wasn't quite comfortable with the exposed contacts so I wrapped some electricians tape to cover it up.
 For the plug from the AC/DC adaptor, this was still the temporary splice from before. I managed to pick up a plug so that it could be properly soldered.
 Unfortunately with the very thick cable, plus having to solder 2-3 wires to each contact on the very small plug, made it more difficult than it should have been.
However I did manage, although you can see the plug cannot be closed properly due to the thick wires. Wrapping some electricians tape however would make do for now. I am thinking to replace the wire completely or even using different set of plugs entirely.
HOW QUIET?
Well certainly this cannot be compared to my inaudible Pundit, and it's too loud for me to keep on top of my desk at ear-level to be considered quiet. However on the floor under the table it is very well behaved, and although still audible it is quiet and unobtrusive. During light use, the noise blends into the background. Even under load running Prime95 and 3DMark2003, although the noise level becomes louder, it is very smooth (consisting mainly of whooshing noise) and not what I would consider loud. Certainly it is a significant improvement over the original Aria PSU configuration.
Temperature wise though is where you pay for this quietness, although on the most part they remained acceptable considering the small size of the Aria and low noise of the system.
CPU fan (Silverstone 92mm 82NF) was set by Speedfan, SYS fan (CoolerMaster 120mm fan) using Fanmate controller (all the way down, and all the way up), VGA fan (Zalman VF700Cu) set using RivaTuner. Ambient temp was 27-28C. IDLE was in Windows, LOAD was with Prime95 and 3DMark2003 running simultaneously.
IDLE (CPU 5x 0.8v) LOW
- CPUfan=1500rpm, SYSfan=550rpm, VGAfan=20%
- CPU=50C, NB?=47C, SYS=45C, HDD=38C, GPU=49C
LOAD* (CPU 9x 1.0v) HIGH
- CPUfan=1600rpm, SYSfan=1100rpm, VGAfan=38%
- CPU=53C, NB?=50C, SYS=45C, HDD=38C, GPUmax=65C
** All temperatures above were recorded with motherboard BIOS version 0601 which seems to overstate temperatures. Upgrading to a newer 0702 BIOS drops the CPU and NB temperature readings by 8C; SYS and HDD remain unchanged.
NOTES
One thing I did notice was the external AC/DC adaptor got very hot after more than half an hour of running. It was too hot to hold for more than 2-3 seconds. This was the same even if the system was only idling. I suspect these bricks are designed to run hot, and also keeping in mind nearly 10-20% of the AC draw is dissipated by the brick, but still the thought of such a hot exposed component on the floor makes me uncomfortable.
In addition, when under 3D load, the 12v rails read from the motherboard sensors dropped from 12.2v all the way down to 11.4v. Although this did not cause any problems, there were no signs of instability, and still within 5% of 12.0v, it would seem that the AC/DC brick is being worked hard.
If I decide to keep the 7800GT in this system I will probably purchase the 220W Delta brick from Shuttle even though at $90 it is quite expensive. However I originally bought the A8NVM-CSM/Aria for an HTPC and the onboard graphics is sufficient for this purpose; I may consider upgrading my main rig and putting the 7800GT in there instead.
Next A8NVM-CSM Aria Update
Back to PW200M installed
posted by Mstac @ 11:58 PM
0 comments
![]()
![]()


0 Comments:
Post a Comment
<< Home